|
How to Take Great Photos (Part 2) 
Nearly everyone enjoys taking pictures and viewing snaps of friends, family, and travel. However, most folks end up producing blah snapshots (at best). Face it, if there wasn't a recognizable person or place in your photo, nobody would have the slightest interest in it. Let's see if we can't kick that up a notch.
In case you're new to the Urbach Letter, here's a link to Part 1 with tips #1 through 12:

Picking up where we left off last month, here are the rest of my tips to help you take better pictures and get the most out of that nice new digital camera of yours.
13. Master the rule of thirds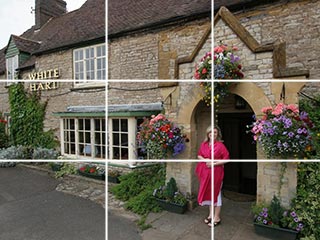 |
Imagine a 3x3 grid (two vertical lines and two horizontal lines) superimposed on your image. The intersections of those lines at the third points are prime locations for your main subject. Also, if you're taking landscape or beach photos, the horizon line should be on the upper or lower horizontal, depending on whether you want to emphasize foreground or sky. |
14. Keep things off center  |
Placing your main subject dead square in the middle of your photo is a perfect way to end up with a boring, static image. Use the rule of thirds if appropriate, or think of an alternative framing that'll bring some energy to your composition. |
15. Frame it |
The world is full of natural frames: doorways, arches, trees and limbs, etc. Try to find positions where foreground objects will frame and enhance your photos. This works especially well for landscape and scenic photos, where it adds a great sense of depth. |
16. Watch your background
Most photo-snappers are only interested in capturing an image of their main subject. Unfortunately, an otherwise great photo can be ruined by a distracting background. You need to look past your subject and observe the environment. Don't let a tree grow out of someone's head! Reposition yourself to avoid including an unwanted fixed object or take the time to move movable stuff (clutter) out of the way. |
17. Use focus as a tool |
To the extent that your camera allows control of focus, use it to enhance your photos. Try throwing the background out of focus (your camera's "portrait" mode may help). Pro portraits almost always have the subject razor sharp against a blurred background. |
18. Paint with light |
Lighting will make or break your photo. Pay attention to your sources, whether manmade or natural. As a training exercise, rather than just looking for interesting subjects to snap, go out and shoot photographs specifically of light and shadow. |
19. Bounce it |
A piece of cheap white foam board makes an excellent reflector. Try taking a portrait, seating your subject by a window and positioning the reflector on the other side, bouncing some light back to partially fill in the shadows. You'll love the result. |
20. Grab some candids |
Posed pictures have their place, but the more memorable shots are often taken when your subjects aren't nervously trying to look their best. The key to good candids is time. Just start snapping pictures while people go about their business (turn off the fake shutter sound if your digicam has that). After a few minutes, people won't pay much attention to you anymore and you'll start to get the natural unposed look you're after. |
21. Shoot during the "golden hour" |
My favorite time to take photos is during the first hour of daylight or the last hour before sunset. The low sun angle and warm color during those times is perfect for portraits and the long shadows add drama to landscapes. |
22. Upgrade!
I know this goes against the 10/90 rule I mentioned last month, but better equipment will enable you to take dramatically better pictures if you know how to use it properly. I have a little "take everywhere" Canon SD750 point-and-shoot and a big 40D SLR with a whole bag of lenses. The little guy is great but when I'm on a photo mission, I take out the big guns. The better camera will enable you to take pictures in lower light without flash, throw the background further into blur (the Japanese call that effect "bokeh" by the way), have more control over exposure, focus, and shutter speed, react more rapidly when you press the shutter release button, and more. |

Wrap up...
One of the things I love about photography is that it's an interesting blend of science and art. It has rules… but they're meant to be broken (if you know you're breaking them, and why). Therefore, don't carve any of my twenty two quick tips in stone. Use 'em as a starting point and then experiment. There's always something new to learn, technically and artistically. Get out there and snap away. Have fun. |
Return to Archive
|
