|
How to Take Great Photos (Part 1) 
You got that nice new digital camera, the one with all the megapixels and everything. So how come your photos still look like you snapped 'em with an Instamatic? (I can help fix that.) Digital cameras, along with iPods and GPS units, are among the hottest-selling devices on the market today. Millions of people are buying digicams for the first time or upgrading earlier models to the latest and greatest. Few of us miss our film cameras. I never hear anybody say, "Gee, I really liked going out to buy film and then paying Fotomat to develop my prints." Besides being much cheaper to use and way more convenient, digicams can take incredible pictures... if you know a few pro secrets.
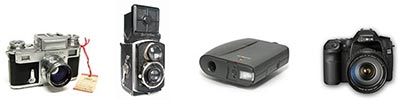
I'll share some of those tips with you in this short article. But first, what qualifies ME to give you advice on the topic? I've been an avid photographer for the past 40 years, ever since I inherited my great grandfather's prewar Zeiss Contax camera at age 11. I've owned many cameras since then, including a classic Rolleiflex twin lens reflex and the very first consumer digital camera, the one-third-of-a-megapixel Apple QuickTake 100 "(July 1994 for $695!). I now mainly shoot with a Canon 40D SLR, but of course have my eye on a bunch of new stuff hitting the market.
On to the tips...
1. RTFM
I'll willing to bet that you've never read your camera's manual (skimming it for 10 minutes the day you opened the box doesn't count). Using your camera in "full auto mode" will virtually guarantee mediocre pictures. There are good reasons why all those little buttons are on your camera. Learn what they do! Those buttons and menu choices will unlock all the creative controls you've paid for. |
2. Take lots of photos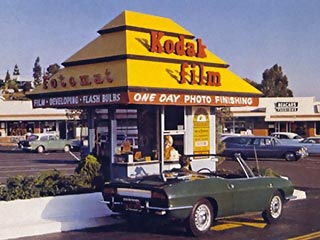 |
It's really true: quality comes out of quantity. One of the greatest things about digicams is that once you buy one, they're essentially free to use. So take tons of pictures. Snap away. Fill up that memory card.
Get away from the scarcity mentality of film, when each press of the shutter cost you half a buck in film and developing cost.
Be totally ruthless when reviewing your pictures. Chuck the ones that are less than great. |
3. It's (almost) all you... not your stuff...
I'll try to break this to you gently: the reason for a great photo is 10% camera and 90% photographer skill. I've seen fabulous prints made from a pinhole camera in the hands of a pro, and (of course) absolutely wretched photos from a $5000 SLR held by a wealthy dilettante. Therefore, the best way to upgrade your photos is by upgrading your skill level, not your equipment. To start, there are some great books to read. I particularly recommend the ones by David D. Busch. |
4. To flash or not to flash
One of the camera's most important setting controls the built-in flash. You must learn how to turn on the flash when your camera doesn't think you need it and turn it off even if the camera thinks it should fire. That leads to the next two tips. |
5. Use flash for outdoor portraits |
Your camera doesn't think you need to use flash outdoors during the day. However, when shooting portraits, they'll usually be improved if you use "fill flash" to supplement the sun's rays. This is particularly true when the sun's overhead, forming deep eye socket shadows that need filling-in, or when your subject is backlit and needs overall illumination to avoid becoming a dark silhouette.
On overcast days, flash will brighten colors and put a nice "catch light" in your subject's eyes. |
6. No flash indoors |
There's no quicker way to give your photos the snapshot look than by using flash when you don't absolutely need it. Flash-lit pictures are contrasty, have harsh shadows, and rarely make people look their best.
You know all about red-eye, but flash causes other portrait evils. It often makes skin appear greasy or pasty. Full-frontal flash flattens facial features (say that 3 times fast) and leads to character-less, boring pictures. Instead of flash, try boosting your camera's ISO (the manual will tell you how), and take maximum advantage of natural or ambient light. |
7. Use a tripod
After demonic red-eye caused by flash, the second big photo killer is blur. You can fix red-eye in software but there's little to be done with a photo that has subject motion or overall blur. If your subject is blurry but everything else is sharp, your shutter speed is too low for the situation. Boost the ISO and/or open up the lens aperture; a tripod won't help. If your whole picture is less than sharp, you can try the above, but your best bet is to use a tripod or monopod. There are many good choices, from tabletop versions to big pro models, and quite a few specialty devices like the Gorillapod, beanbag, and clamp types. Any of them will yield far superior results to hand-holding your camera - and you'll finally be able to get in the picture too! |
8. Don't use a tripod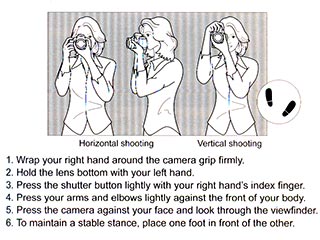 |
Even though a tripod will enable you to take sharper, often better composed photos, it's not always practical to take one along or set it up. Therefore, you must learn to hold and shoot your camera properly. What you don't want to do is just whip the camera up to your face and slam down on the shutter release button. Take your time. Place your feet apart in a wide, stable stance. If your camera has an optical viewfinder, use it instead of the LCD. Pressing the camera against your face stabilizes it much better than holding it out in front of you. Pull your elbows in against your sides for even more stability. Press the shutter release down only half way while you compose your picture. Take a breath and let it out slowly. When you're halfway through the exhale, press the shutter all the way. For your patience and effort, you'll be rewarded by much sharper, better framed photos. |
9. Hold it level |
Be sure to keep the horizon level in your photos. This is especially important at the beach or lake. If the camera is tilted to one side, all the water will pour out the edge of your photo. Seriously, it's going to look bad.
Another no-no is tilting your camera up to photograph a tall building. The distorted perspective will make the building appear to "fall back" out of the photo. Much better to instead move farther back and (of course) use the wide-angle setting if you can. |
10. Get in close
Many photos can be improved by zooming in closer. A tightly-framed portrait will often look better than one with a lot of distracting details in the background. And most new digicams have "macro" capability that'll enable you to explore a whole new interesting world. |
11. Stand back
When shooting portraits, keep your distance and use the middle range of your zoom. If you stand too close and use the wider angle setting, it'll exaggerate your subject's nose while making the ears appear too small. Better to stand back about 8 to 12 feet and zoom to frame the head and shoulders. A medium telephoto zoom (~80 to 130 mm) will flatter your subject. |
12 One subject at a time please
|
Unless you're intentionally shooting a group of people (of equal importance), your photo should emphasize only one subject. If you've got three interesting things, shoot three photos. Otherwise your viewer won't know where to focus his or her attention.
This example portrait of an executive is very effective. There's no doubt who's in charge here. Your attention is drawn immediately to her eyes, then her smile and confident expression, then to her assistants/colleagues. The background is simple, portraying an office setting without clutter.
The same "one thing at a time" advice goes for non-people images. Pick one "hero" element and feature it prominently. |
More tips next month
I'll have lots more tips and photo examples for you in Part II of this article in the November Urbach Letter. |
Return
to Archive
|
